
Your website is polished, professional, and ready. But right now, it only exists in Replit’s preview environment. It’s time to transform that preview URL into an actual business website that clients can find, visit, and trust. This section walks you through deployment, custom domains, and everything else you need to know to make your site real.
Understanding Your Deployment Options
Replit makes deployment surprisingly simple, but you need to understand your options to make the right choice for your business.
Default Deployment
When you hit deploy with basic settings, Replit gives you:
- A live website immediately
- A URL like your-project.replit.com
- SSL security (that padlock in the browser)
- Automatic updates when you make changes
- Basic analytics about visitors
This is perfect for testing, sharing with a few people, or getting feedback. But for a professional business, you need more.
Deploy With a Custom Domain
This will allow you to use your own domain like yourbusiness.com. This is essential for professionals and business owners, as it helps the site appear more credible.
Replit allows you to connect any domain from any registrar, such as GoDaddy, Namecheap, and more. You can also choose to register a domain through Replit, which will cost you around $20/year for common top-level domains like .com, .ai, and more.
For most brand websites, the autoscale deployment tier with a custom domain is perfectly adequate. You’re not running Facebook here – you’re showcasing your business.
Step-by-Step Deployment Process
Step 1: The Pre-Deployment Check
Before hitting deploy, ensure your site is actually ready. You can do this by asking the AI agent to:
Please run a final pre-deployment check:
- Verify all links work correctly
- Confirm the contact form is connected
- Check that all placeholder content is replaced
- Ensure mobile responsiveness is perfect
- Verify no console errors exist
The AI will run through everything and report back. Fix any issues before proceeding.
Step 2: Initial Deployment
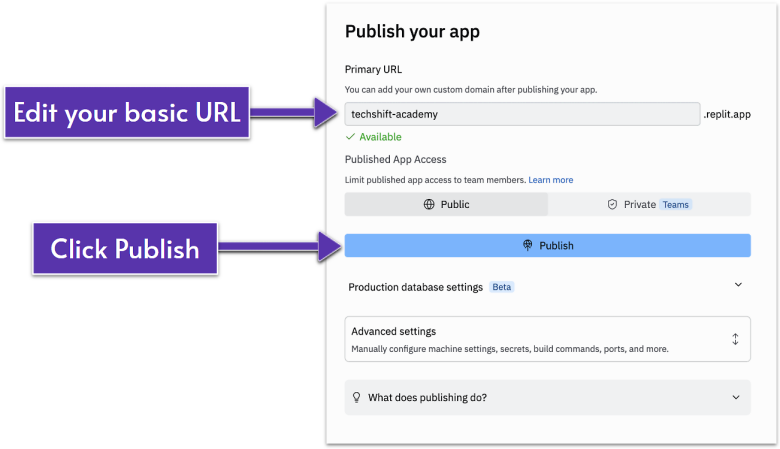
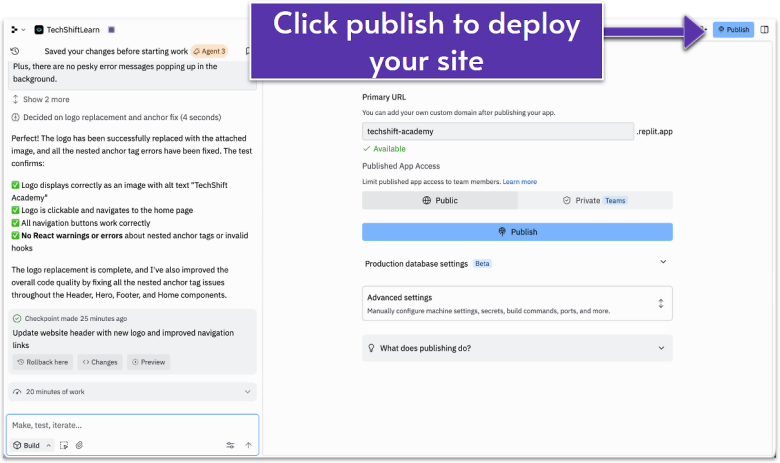
Look for the Publish button ( ) in the top-right corner of your Replit workspace. Click it, and you’ll be presented with the deployment interface.
What you’ll see:
- App name. This becomes part of your URL
- Deployment settings. Leave these as default initially
- Resources. Shows what computing power you’re using
- Custom domain. We’ll handle this separately below
Once you’re ready, click Publish ( ).
Step 3: Watching the Deployment
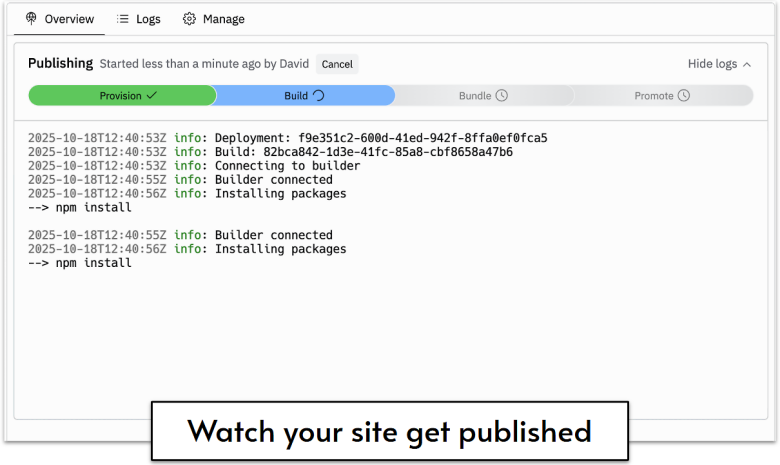
The deployment process takes about 30-60 seconds. When it’s complete, click your new URL to confirm your site is online.
Congratulations – your website is now live on the internet! Anyone with this link can visit your professional site.
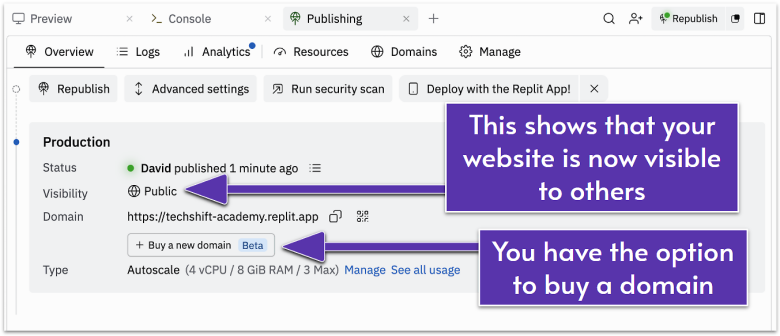
Custom Domain Setup: Essential for Brand Credibility
A replit.com URL screams “temporary project.” A custom domain like yourbusiness.com says “established business.” Let’s get you one.
Buying Your Domain: What You Need to Know
Where to Buy
Popular registrars offer competitive pricing and reliable service:
- Namecheap – Often the cheapest, straightforward interface
- Porkbun – Budget-friendly with free WHOIS privacy
- Squarespace Domains – Clean interface, slightly higher prices
- GoDaddy – Largest registrar, frequent sales but watch for upsells
Average costs: .com domains typically run $10-15/year. Some registrars offer first-year discounts ($2-5), but renew at standard rates.
Searching for Your Domain
Go to any registrar and type your desired domain in the search bar. You’ll see:
- Available domains – Ready to purchase
- Taken domains – Already owned by someone else
- Alternative suggestions – Similar available options
Understanding Domain Extensions
The extension (or TLD – top-level domain) affects both price and perception:
- .com – $10-15/year, most credible, always your first choice
- .net, .org – $10-15/year, acceptable alternatives
- .co – $20-30/year, modern feel, works for tech/startups
- .io – $30-50/year, popular with tech companies
- .ai – $50-80/year, trendy for AI-related businesses
- .xyz, .online, .site – $2-10/year, but looks less professional
Stick with .com if possible. It’s what people expect and type automatically.
Paying for Your Domain
Unlike your website build (one-time cost), domains renew yearly. Set calendar reminders before expiration – if your domain expires, someone else can buy it.
Most registrars auto-renew by default, which prevents accidental loss. Keep this enabled.
Domain Privacy Protection: Worth It?
When you register a domain, your contact info (name, email, phone, address) becomes publicly searchable through WHOIS databases. Domain privacy (also called WHOIS protection) hides this information, replacing it with the registrar’s details.
Recommendation: Yes, get it. It costs $0-10/year depending on the registrar (Porkbun and some others include it free). Without it, expect spam emails and calls. Many registrars include privacy for free check before paying extra.
Buying Through Replit vs Third-Party Registrars
Replit’s Domain Purchase:
- Slightly more expensive ($20-30/year for .com)
- Automatic connection (no DNS setup needed)
- Everything in one dashboard
- Good if you value simplicity over savings
Third-Party Registrars:
- Cheaper ($10-15/year for .com)
- Requires DNS configuration (we’ll show you how below)
- More control and flexibility
- Better if you might move hosting later
For your first domain, either works fine. Saving $10/year matters less than getting your site live quickly.
Domain Selection Tips
Before purchasing:
- Keep it short – Easier to remember and type
- Avoid hyphens – yourbusiness.com beats your-business.com
- Check social media – Make sure @yourbusiness is also available on key platforms for consistency
- Consider buying variations – If you buy yourbusiness.com, consider also buying yourbusiness.net to prevent confusion
Connecting Your Domain to Replit
Once you’ve purchased your domain (whether through Replit or a third-party registrar), you’ll need to connect it to your deployed site.
If you bought through Replit: You’re automatically connected – skip to the testing section.
If you bought through a third-party registrar: Follow the DNS configuration steps below.
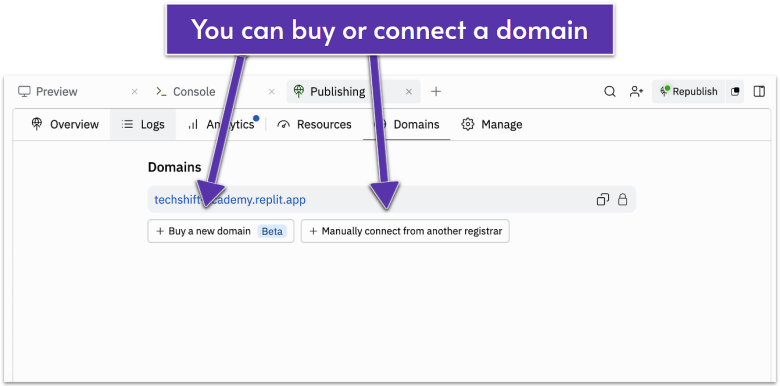
How to Connect a Third-Party Domain
If you bought yourbusiness.com from GoDaddy, Namecheap, or another registrar instead of Replit, here’s how to connect it:
Step 1. In Replit’s deployment settings, click Connect a custom domain.
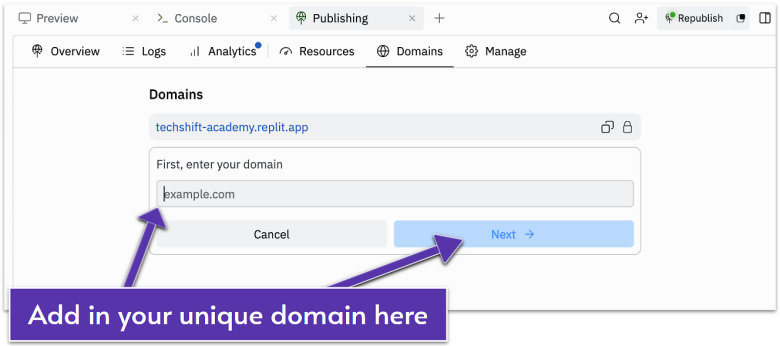
Step 2. Enter your domain name (e.g., strategicgrowthpartners.com).
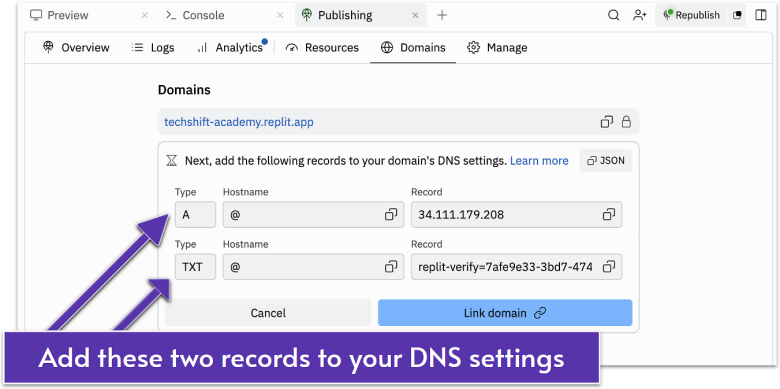
Step 3. Replit will provide two DNS records:
- An A record pointing to their IP address
- A TXT record for verification
Keep this window open so that you can easily copy these records. These records are going to look exactly the same as you see here except for the record/value at the very end.
Step 4. Go to your domain registrar’s DNS settings and add both records. See below for guides on how to access these settings and properly fill them out on popular registrars.
DNS Configuration by Popular Registrars
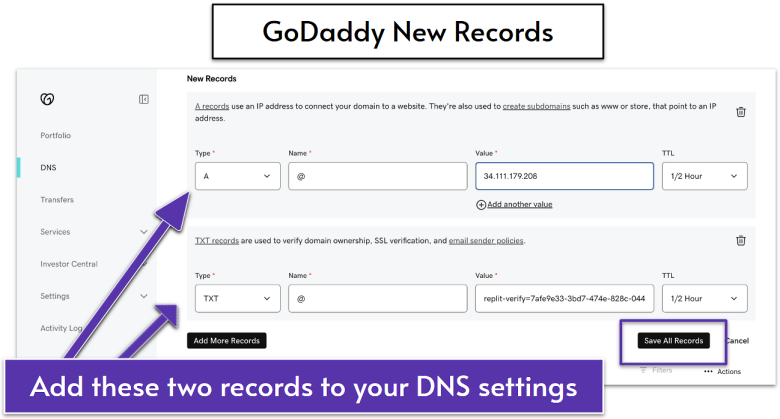
GoDaddy:
- Log into your GoDaddy account
- Go to My Products → Your domain → DNS
- Click Add in the DNS Records section
- Type: A, Host: @, Points to: [Replit’s IP]
- Add another – Type: TXT, Host: @, Value: [Replit’s verification]
- Save all records
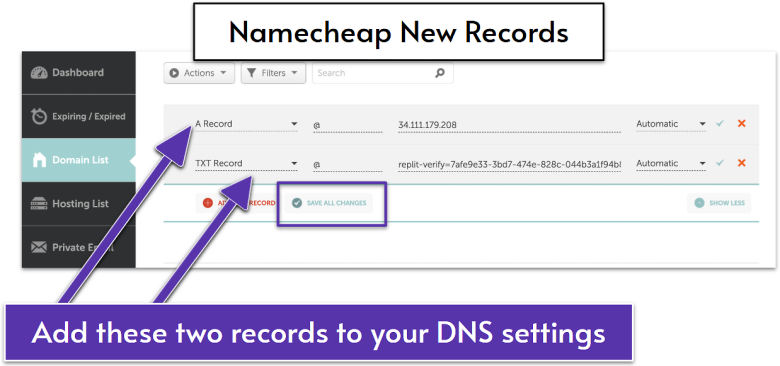
Namecheap:
- Sign in to Namecheap
- Go to Domain List, then click Manage next to your domain
- Select Advanced DNS
- Add new record – Type: A Record, Host: @, Value: [Replit’s IP]
- Add another – Type: TXT Record, Host: @, Value: [Replit’s verification]
- Save your changes
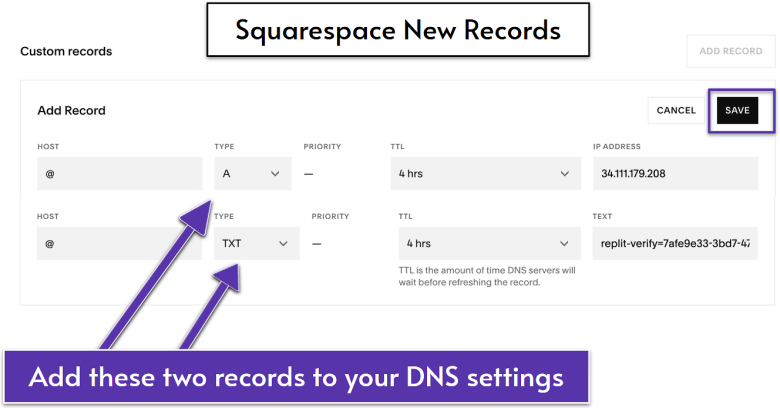
Squarespace Domains:
- Access your Squarespace Domains dashboard
- Click your domain in your account on the top left
- Then click on DNS on the left
- Under Custom records, click Add
- Create an A record with Replit’s IP
- Create a TXT record with Replit’s provided verification number
- Save your changes
Cloudflare (If using their DNS):
- Log into Cloudflare dashboard
- Select your domain
- Go to DNS settings
- Add an A record: Name: @, IPv4: [Replit’s IP]
- Add a TXT record: Name: @, Content: [Replit’s verification]
- Ensure proxy status is DNS only (gray cloud)
DNS Propagation
After adding DNS records, your domain may not work immediately. This is because of a process called DNS propagation. This is when servers around the world update their records to recognize that your domain now points to your Replit site. It ta takes:
- Usually: 5-30 minutes
- Sometimes: Up to 4 hours
- Rarely: Up to 48 hours
While waiting, your site is still accessible via the Replit URL. You can check propagation status at whatsmydns.net – enter your domain and watch it turn green across global servers.
DNS Troubleshooting: Common Issues and Fixes
Domain not loading after adding DNS records?
Most issues fix themselves with time. If your domain isn’t working:
- Wait longer. DNS can take up to 48 hours (usually 30 minutes to 4 hours)
- Check your records. Make sure you copied Replit’s DNS records exactly (no typos or extra spaces)
- Try incognito mode. Your browser might be caching the old version
- Still broken after 48 hours? Email Replit’s support team.
Professional Testing & Launch Checklist
Your domain is connected. Your site is live. But before announcing it to the world, run through this final checklist:
Technical verification:
- Custom domain loads correctly
- SSL certificate is active (padlock icon appears next to the URL in your browser)
- All pages load without errors
- Contact form delivers to the correct email
Cross-device/browser testing:
- Check all pages and elements properly display and work on each device and browser
- Desktop: Chrome, Safari, Firefox, Opera, Edge
- Mobile: iPhone Safari, Android Chrome
- Tablet: iPad, Android tablets
Business information accuracy:
- Phone number is correct and clickable
- Email addresses work
- Physical address is accurate (if listed)
- Business hours are current
- Social media links function
The Victory Moment
Take a breath. Open your phone. Type in your domain. Watch your professional website load.
You built this. Not with templates. Not with drag-and-drop builders. You created a custom, professional website by describing what you wanted. Your business now has a digital home that looks like it cost thousands and took weeks to build.
Share it with someone. Post it on LinkedIn. Add it to your email signature. This is real!
What Happens Next?
Your website is live, professional, and ready for visitors. The best part? You can continue maintaining and improving your site using the same basic techniques from this guide – updating content, adding sections, fixing issues –without ever touching anything advanced.
The next section covers advanced vibe coding techniques like how to create animations that wow, implement interactions that engage, and perform optimizations that set you apart from the competition.
But honestly? You could stop here and have a better website than 90% of small businesses. Everything from here is a bonus.
Ready to go beyond the basics? Let’s explore some advanced techniques.
